Build an ETH Price Tracker with Powerloom
This blog introduces the series on harnessing Powerloom Protocol to build data-rich applications, focusing on an essential use case: setting up a price tracker for the Ethereum token, which will be referred to as ETH from here on.

This blog introduces the series on harnessing Powerloom Protocol to build data-rich applications, focusing on an essential use case: setting up a price tracker for the Ethereum token, which will be referred to as ETH from here on.
In this continuously evolving Web3 ecosystem, where accurate, real-time data is indispensable, developers often face challenges in obtaining reliable data for their decentralized applications (dApps). Trusting data that may not be precise or accurate can result in inconsistencies and inefficiencies, particularly in volatile markets like cryptocurrency.
We address these challenges by providing a reliable framework for capturing and utilizing precise data. This blog will walk you through setting up an ETH price tracker, demonstrating how Powerloom can revolutionize your data-handling approach and enhance your applications' reliability.
Tracking real-time changes in ETH's price conversion ratio is vital for numerous decentralized applications (dApps). This use case demonstrates leveraging our data network to capture these changes accurately.
Watch the tutorial below for a detailed walkthrough.
Steps to Implement this Use Case
Cloning the Deploy Repository
First, clone the deploy repository to set up your environment. Open the terminal and run the following command:
git clone <https://github.com/PowerLoom/deploy.git> --single-branch powerloom_deploy --branch devnet && cd powerloom_deploy
This command clones the repository into a directory named powerloom_deploy.
Let’s break down this bash command to understand what is happening here:
git clone: This command creates a copy of an existing Git repository.
https://github.com/PowerLoom/deploy.git: This is the remote repository URL you want to clone.
--single-branch: This tells Git to clone only the specified branch instead of all branches.
powerloom_deploy: This specifies the directory name where the cloned repository will be stored locally.
--branch devnet: This option specifies which branch you want to clone. Here, it indicates the devnet branch.
&&: This is a logical AND operator in shell commands. It ensures that the next command runs only if the previous command is successful.
cd powerloom_deploy: This command changes the current directory to powerloom_deploy.
Configuring the Node
cp env.example .env
Now, Copy env.example to .env using the cp command.
Open the newly created .env file in a code editor and modify the environment variables as required for your specific setup.
Required Variables
SOURCE_RPC_URL: The ETH RPC service URL (e.g., Infura, Alchemy). This should point to the ETH mainnet.SIGNER_ACCOUNT_ADDRESS: An unused "burner" address.SIGNER_ACCOUNT_PRIVATE_KEY: The private key for the signer account.SLOT_ID: Your Devnet Slot ID.
These variables are crucial for setting up your node to interact with the ETH blockchain.
Default Variables
The following variables are pre-configured and generally do not need modification:
SNAPSHOT_CONFIG_REPO: Repository for snapshot configurations.SNAPSHOT_CONFIG_REPO_BRANCH: Branch for ETH price monitoring.SNAPSHOTTER_COMPUTE_REPO: Repository for compute modules.SNAPSHOTTER_COMPUTE_REPO_BRANCH: Branch for ETH price monitoring.PROTOCOL_STATE_CONTRACT: The contract address for the protocol state.RELAYER_HOST: The relayer URL for the Powerloom Protocol Chain.NAMESPACE: The unique key to identify your project namespace.- **
PROST_CHAIN_ID**:Devnet chain ID. PROST_RPC_URL: URL for the PROST RPC service.POWERLOOM_REPORTING_URL: URL for reporting to Powerloom.
Example of Edited .env File:
# Required variables
SOURCE_RPC_URL=https://mainnet.infura.io/v3/YOUR_INFURA_PROJECT_ID
SIGNER_ACCOUNT_ADDRESS=0xYourBurnerAccountAddress
SIGNER_ACCOUNT_PRIVATE_KEY=your-private-key-here
SLOT_ID=your-devnet-slot-id

# Default variables
SNAPSHOT_CONFIG_REPO=https://github.com/powerloom/snapshotter-configs
SNAPSHOT_CONFIG_REPO_BRANCH=eth_price_monitor
SNAPSHOTTER_COMPUTE_REPO=https://github.com/powerloom/snapshotter-computes
SNAPSHOTTER_COMPUTE_REPO_BRANCH=eth_price_monitor
PROTOCOL_STATE_CONTRACT=0xProtocolStateContractAddress
RELAYER_HOST=https://relayer-devnet.powerloom.io
NAMESPACE=DEVNET
PROST_CHAIN_ID=devnet-chain-id
PROST_RPC_URL=https://rpc-prost1h-proxy.powerloom.io
POWERLOOM_REPORTING_URL=https://reporting.powerloom.io
Snapshot Building
What is Snapshot Building?
Snapshot building is the process of capturing and recording specific data points from the blockchain at regular intervals. This helps in monitoring and analyzing the state of the blockchain over time.
Snapshotter node has a simple interface as part of GenericProcessorSnapshot class that business logic specific computes need to implement. The rest of the heavy lifting around reliable submissions and finalization is taken care of by the rest of the features of the node.
In this case, EthPriceProcessor located in snapshotter/modules/computes is the sole compute class for ETH price tracking. This class implements the GenericProcessorSnapshot interface, most notably the compute() callback. This callback is where we build the snapshots.
Code Example
Here's an excerpt from eth_price_tracking.py:
from typing import List
from typing import Tuple
from typing import Union

from redis import asyncio as aioredis

from .utils.models.message_models import EthPriceSnapshot
from snapshotter.utils.callback_helpers import GenericProcessorSnapshot
from snapshotter.utils.default_logger import logger
from snapshotter.utils.models.message_models import PowerloomSnapshotProcessMessage
from snapshotter.utils.rpc import RpcHelper
from snapshotter.utils.snapshot_utils import get_eth_price_usd

class EthPriceProcessor(GenericProcessorSnapshot):
    transformation_lambdas = None

    def __init__(self) -> None:
        self.transformation_lambdas = []
        self._logger = logger.bind(module='EthPriceProcessor')

    async def compute(
        self,
        epoch: PowerloomSnapshotProcessMessage,
        redis_conn: aioredis.Redis,
        rpc_helper: RpcHelper,

    ) -> Union[None, List[Tuple[str, EthPriceSnapshot]]]:
        min_chain_height = epoch.begin
        max_chain_height = epoch.end

        if max_chain_height != min_chain_height:
            self._logger.error('Currently only supports single block height')
            raise Exception('Currently only supports single block height')

        token_price_dict = await get_eth_price_usd(
                from_block=epoch.begin, to_block=epoch.end,
                redis_conn=redis_conn, rpc_helper=rpc_helper,
            )

        snapshot = EthPriceSnapshot(
            block=epoch.begin,
            price=token_price_dict[epoch.begin]
        )
        return [("example", snapshot)]
Explanation of the Code in Detail
Class Definition
class EthPriceProcessor(GenericProcessorSnapshot):
    transformation_lambdas = None

    def __init__(self) -> None:
        self.transformation_lambdas = []
        self._logger = logger.bind(module='EthPriceProcessor')
Defines the EthPriceProcessor class.
EthPriceProcessor(GenericProcessorSnapshot): Indicates that this class extends theGenericProcessorSnapshotinterface.transformation_lambdas: Initially set toNone, then initialized as an empty list in the constructor. These could be transformation functions applied to the data.__init__(): The constructor method that initializes the class instance.self._logger: Binds the logger to this specific module, allowing for more specific log messages.
Compute Method
async def compute(
    self,
    epoch: PowerloomSnapshotProcessMessage,
    redis_conn: aioredis.Redis,
    rpc_helper: RpcHelper,
) -> Union[None, List[Tuple[str, EthPriceSnapshot]]]:
    min_chain_height = epoch.begin
    max_chain_height = epoch.end

    if max_chain_height != min_chain_height:
        self._logger.error('Currently only supports single block height')
        raise Exception('Currently only supports single block height')
The compute() method is the core function where snapshots are created.
Parameters:
epoch: An instance ofPowerloomSnapshotProcessMessagethat provides the range of blocks for the snapshot.redis_conn: A Redis connection for caching or temporary storage.rpc_helper: An instance ofRpcHelperfor making RPC calls to the ETH blockchain.
token_price_dict = await get_eth_price_usd(
        from_block=epoch.begin, to_block=epoch.end,
        redis_conn=redis_conn, rpc_helper=rpc_helper,
    )
Calls the get_eth_price_usd function to fetch the ETH price for the specified block range.
Parameters:
from_blockandto_block: Specifies the block range for which to fetch the price.redis_conn: The Redis connection for caching.rpc_helper: The RPC helper for blockchain interaction.
token_price_dict is a dictionary with block heights as keys and ETH prices as values.
snapshot = EthPriceSnapshot(
    block=epoch.begin,
    price=token_price_dict[epoch.begin]
)
return [("example", snapshot)]
Creates an instance of EthPriceSnapshot with the block height and the corresponding ETH price.
block: The block height.price: The ETH price at that block height.
Returns a list containing a tuple with a string ("example") and the EthPriceSnapshot instance. This is the final snapshot data.
This code defines an EthPriceProcessor snapshot compute class for tracking ETH prices and creating snapshots of this data at specific blockchain heights.
The compute() callback method implemented here, fetches the ETH price for a given block height using the get_eth_price_usd function and then creates a snapshot of this data.
The above callback is defined as part of GenericProcessorSnapshotinterface, which this class implements. This ensures that all necessary methods are provided and that the snapshot process is consistent and reliable. Ultimately, we have a simple to implement logic that monitors the ETH price accurately and efficiently within the specified block range.
Utility Function
Here's an excerpt from snapshotter/utils/snapshot_utils.py :
total_eth_liquidity = (
    dai_eth_pair_eth_reserve +
    usdc_eth_pair_eth_reserve +
    usdt_eth_pair_eth_reserve
)

daiWeight = dai_eth_pair_eth_reserve / total_eth_liquidity
usdcWeight = usdc_eth_pair_eth_reserve / total_eth_liquidity
usdtWeight = usdt_eth_pair_eth_reserve / total_eth_liquidity

eth_price_usd = (
    daiWeight * dai_price +
    usdcWeight * usdc_price +
    usdtWeight * usdt_price
)
The get_eth_price_usd() function is designed to calculate the price of ETH in USD. This function uses the weighted average method to determine the price by considering its price conversion ratios against three stablecoins: DAI, USDC, and USDT. These ratios are obtained from Uniswap V2 pair contracts. The weights are relative to the total liquidity locked in these pairs against the Wrapped ETH (WETH) token.
Let's break down the code and understand each part in detail.
Calculating Total ETH Liquidity
total_eth_liquidity = (
    dai_eth_pair_eth_reserve +
    usdc_eth_pair_eth_reserve +
    usdt_eth_pair_eth_reserve
)
This calculates the total amount of ETH liquidity across the three Uniswap V2 pairs: DAI-ETH, USDC-ETH, and USDT-ETH.
dai_eth_pair_eth_reserve: The amount of ETH in the DAI-ETH pair.usdc_eth_pair_eth_reserve: The amount of ETH in the USDC-ETH pair.usdt_eth_pair_eth_reserve: The amount of ETH in the USDT-ETH pair.
The total ETH liquidity is used to determine the weight of each stablecoin pair's contribution to the overall ETH price calculation.
Calculating Weights
daiWeight = dai_eth_pair_eth_reserve / total_eth_liquidity
usdcWeight = usdc_eth_pair_eth_reserve / total_eth_liquidity
usdtWeight = usdt_eth_pair_eth_reserve / total_eth_liquidity
This calculates the weight of each stablecoin pair's ETH reserve relative to the total ETH liquidity.
daiWeight: The proportion of the DAI-ETH pair's ETH reserve to the total ETH liquidity.usdcWeight: The proportion of the USDC-ETH pair's ETH reserve to the total ETH liquidity.usdtWeight: The proportion of the USDT-ETH pair's ETH reserve to the total ETH liquidity.
These weights indicate the significance of each pair's contribution to the overall ETH price calculation, ensuring that pairs with higher liquidity have more influence on the final price.
Calculating Weighted Average ETH Price
eth_price_usd = (
    daiWeight * dai_price +
    usdcWeight * usdc_price +
    usdtWeight * usdt_price
)
This calculates the weighted average price of ETH in USD using the weights and the respective prices from each stablecoin pair.
daiWeight * dai_price: The contribution of the DAI-ETH pair to the overall ETH price.usdcWeight * usdc_price: The contribution of the USDC-ETH pair to the overall ETH price.usdtWeight * usdt_price: The contribution of the USDT-ETH pair to the overall ETH price.
This calculation provides a more accurate and balanced price of ETH by considering the liquidity and price data from multiple stablecoin pairs. It ensures that the price reflects the most liquid markets.
The get_eth_price_usd() function calculates the price of ETH in USD by taking a weighted average of its price conversion ratios against DAI, USDC, and USDT. The function accounts for the liquidity in each pair to determine the weights, ensuring that pairs with higher liquidity have a greater impact on the final price. This method provides a more accurate and reliable ETH price by leveraging the liquidity and price data from multiple sources. This approach is particularly useful in decentralized finance (DeFi) applications where accurate pricing is crucial for trading, lending, and other financial activities.
Set Up the Codebase
Setup the codebase by running the bootstrap.sh command in the terminal. Developers may use different shells, such as bash or zsh. Adjust the command accordingly.
For bash:
bash bootstrap.sh
or for zsh :
zsh bootstrap.sh
Run the Snapshotter Node
bash build.sh
or
zsh build.sh
Once your node is running, the core API server can be found on http://localhost:8002. It comes with an easy to use SwaggerUI at http://localhost:8002/docs to test out the endpoints to retrieve snapshotted data, or monitor the node status among other things.
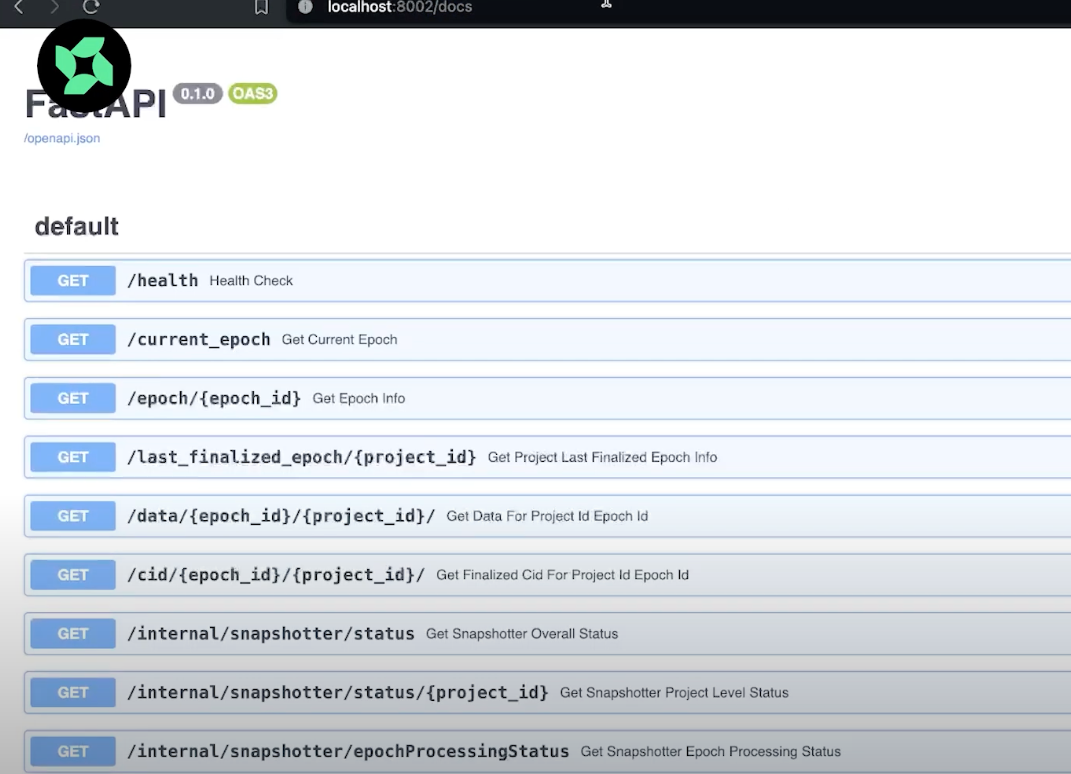
The snapshotted data as generated by the compute module referred to above is retrieved from /data/{epoch_id}/{project_id} endpoint. It requires two parameters
epoch_id (int): the epoch ID against which it will fetch the snapshotted data.project_id (str): refer to project id generation to know more. In this example, it is the concatenation of the the first element in the tuple returned from the snapshot compute module's implementation ofcompute()along with the project type prefix as found in the corresponding config for this snapshotter node.
Example of Project ID Generation
{
  "project_type": "eth:price_tracking"
}
This part of the configuration specifies the type of project. In this case, it indicates that the project is related to ETH price tracking.
The project type prefix (eth:price_tracking) is used as part of the project_id to ensure it uniquely identifies the type of data being snapshotted.
When the compute() method in the EthPriceProcessor class is implemented, it returns a tuple. The first element of this tuple, combined with the project type prefix, forms the project_id
class EthPriceProcessor(GenericProcessorSnapshot):
    # ... (other methods and initialization)

    async def compute(
        self,
        epoch: PowerloomSnapshotProcessMessage,
        redis_conn: aioredis.Redis,
        rpc_helper: RpcHelper,
    ) -> Union[None, List[Tuple[str, EthPriceSnapshot]]]:
        # ... (computation logic)

        snapshot = EthPriceSnapshot(
            block=epoch.begin,
            price=token_price_dict[epoch.begin]
        )
        return [("example", snapshot)]
The compute() method returns a tuple where the first element is "example". If the project type prefix is "eth:price_tracking", the project_id would be "eth:price_tracking:example".
Verifying snapshotted data
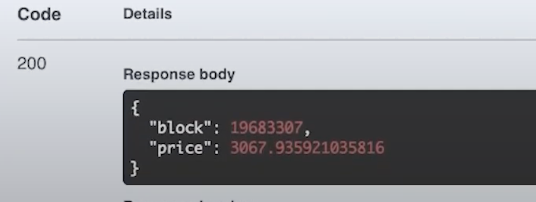
As the node continues snapshotting data, the quickest way to check the snapshotted data is to check against epoch_id and project_id returned in the logs. Copy these values and paste them in the endpoint to retrieve project data in the SwaggerUI exposed against the core API.

For example, in the screenshot above, the epoch_id is 100792. Hit execute. The corresponding snapshotted data to this specific epoch_id displays the price of ETH as 3067.935921.
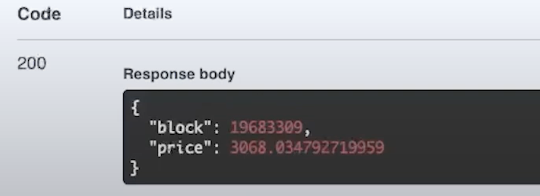
As the epoch_id moves ahead to 100793, we find the above endpoint reflects the latest price captured of ETH as 3068.034792
How to program this
Define the correct project ID against which data has to be fetched
project_type = "eth:price_tracking"  # from <https://github.com/PowerLoom/snapshotter-configs/blob/eth_price_monitor/projects.example.json#L4>
project_namespace = "DEVNET"  # from <https://github.com/PowerLoom/deploy/blob/95ceb83a97a16279816c406eef484245df483fb1/env.example#L25>
data_source = "example"  # from <https://github.com/PowerLoom/snapshotter-computes/blob/15059013c6c17327d1c0d413d3885c23a6383305/eth_price_tracking.py#L45>
project_id = f'{project_type}:{data_source}:{project_namespace}'
- Fetch the last finalized epoch from the API endpoint
http://localhost:8002/last_finalized_epoch/{project_id} - Fetch the data against this epoch ID from the API endpoint
http://localhost:8002/data/{epoch_id}/{project_id}
Conclusion
By following this guide, you can set up a robust ETH price tracker using Powerloom’s decentralized and verified data network. This process ensures data accuracy and enhances the reliability of your data-rich DeFi applications. For any support or clarification, contact us on our Discord developer channel.
About Powerloom: The Composable Data Network for Web3
At the forefront of onchain data protocols, Powerloom serves the evolving needs of smart contract-based applications in sectors like DeFi, GameFi, and NFTs. Our approach incentivizes consensus on state transitions and event emissions, transforming raw data into a structured and easily accessible format. Powerloom is committed to decentralization, offering a lower entry barrier. We make it feasible for more ecosystem participants to contribute to and benefit from the network.